1. Groundmass Basalt Separation
Standard protocol for basalt groundmass separation. The focus of this procedure is to separate groundmass down to the target grain size (e.g. 150 - 250 microns). The sample is initially trimmed of alteration rinds using a steel saw followed buy crushing using a steel hammer and steel plate to break down the size of the pieces for use in a large or small jaw crusher. After the sample has been broken down into the desired grain size using a jaw crusher, the sample is sieved and washed until all fine particles are removed. Next magnetic separation methods are used to isolate the groundmass phase from phenocryst phases if they exit. A uniform and homogenous groundmass portion is selected for acid leaching. After acid leaching, the material is once again sieved and magnetically separated as the grains are too have likely have change after acid leaching. After the final sieve and magnetic separation, the groundmass is picked under a binocular microscope. The picked groundmass grains should be representative of the rock and free of visible ateration and limited phenocrysts.
This procedure is based on [Koppers_et_al_2000]
1.1. Petrographic Thin Sections: Prep and Submitting an order [1]
Method for preparing a thin section billet. To be used for preparing a billet to be sent to Wagner Petrographic or to client.
Description
Rock is slabbed into two inch slabs using a diamond rimmed saw. A representative 2x2x3 inch piece of the rock.
Steps
Slab rock into two inch thick slices.
Remove any visible weathering rinds.
Identify region of slab that best represents the composition of the rock. Outline with marker.
Determine Dimensions of Desired Thin Section
Standard: 24x46 mm [0.9x1.8 in]
Large : 76x51 mm [3x2 in]
Use a rock saw extract a piece that is roughly 2-3x bigger than the required thin section.
Place piece into 6 mil bag. Write the sample identifier on both sides.
Place Tyvek tag with sample identifier in the with sample.
Samples are sent to Wagner Petrographic for thin sections [http://wagnerpetrographic.com/].
Preparation
Submitting an Order
Fill out the excel spreadsheet with sample names and desired types of thin sections.
DropboxArgon Laboratory SharedMineral Separation LabThin Section Forms
Fill out Order form
Name: Dan Miggins
Phone: 541-737-5206
Address Line 1: Oregon State University Argon Geochronology Lab
Address Line 2: 104 CEOAS Administration Building
City: Corvallis
Sate: Oregon
ZIP: 97331-5503
Country: United States
Special Instructions: E.g. No cover slip!, Double polished
Processing Time:
Print an extra copy of the form
Packaging
Place samples into the appropriate size box wrapped well with bubble wrap.
Place extra copy with with samples inside the box.
Close box and tape well with packaging tape.
Label box for shipping.
Shipping
Take box to shipping and fill out the shipping form and tape it to the box with a piece of scotch tape.
Place box on the outgoing mail shelf.
1.2. Small Jaw Crusher Method
Description
This method of crushing a rock is meant for large amounts of material. Ideally the sample would only need to go through the large crusher once and enough fine material should be generated for mineral separation.
Procedure
1.2.1. Workspace Preperation
Wipe down all surfaces with water and ethyl alcohol.
Inspect and clean equipment.
1.2.1.1. Clean Small Jaw Crusher
Procedure to clean the small jaw crusher in Wilkenson.
Steps
clean steel plates
Remove steel plates from bolts and place on the work area.
Spray the plates with distilled water and scrub with a wire brush to remove debri from plates.
Wipe down the plates with a paper towel and spray the plates with ethanol or acetone.
Dry plates with a paper towel.
wipe down jaw crusher
Wet a paper towl with distilled water.
Wipe down all surfaces of the jaw crusher to remove dust.
Pay special attention to the area beneath the axle of the back plate.
After the crusher has been wiped down with a wet towel, repeat with a clean dry paper towel.S
1.2.2. Operating the Small Jaw Crusher
Procedure for crushing samples using the small jaw crusher in Wilkinson. The small jaw crusher is generally used for crushing small amounts of sample. The size of the material going into the crusher should be no larger than 1 cubic inch.
Steps
Install the 4 steel plates.
Screw in the large rear bolt that changes the front plate’s position and keep it fully open.
Turn on the crusher and asses that it is functioning properly.
Place a single piece of rock in the crusher.
If crushing a lot of material, be sure to occasionally check the pan and make sure the crushed material is not overflowing.
Turn off the crusher.
Remove pan and dump material onto a sheet of paper.
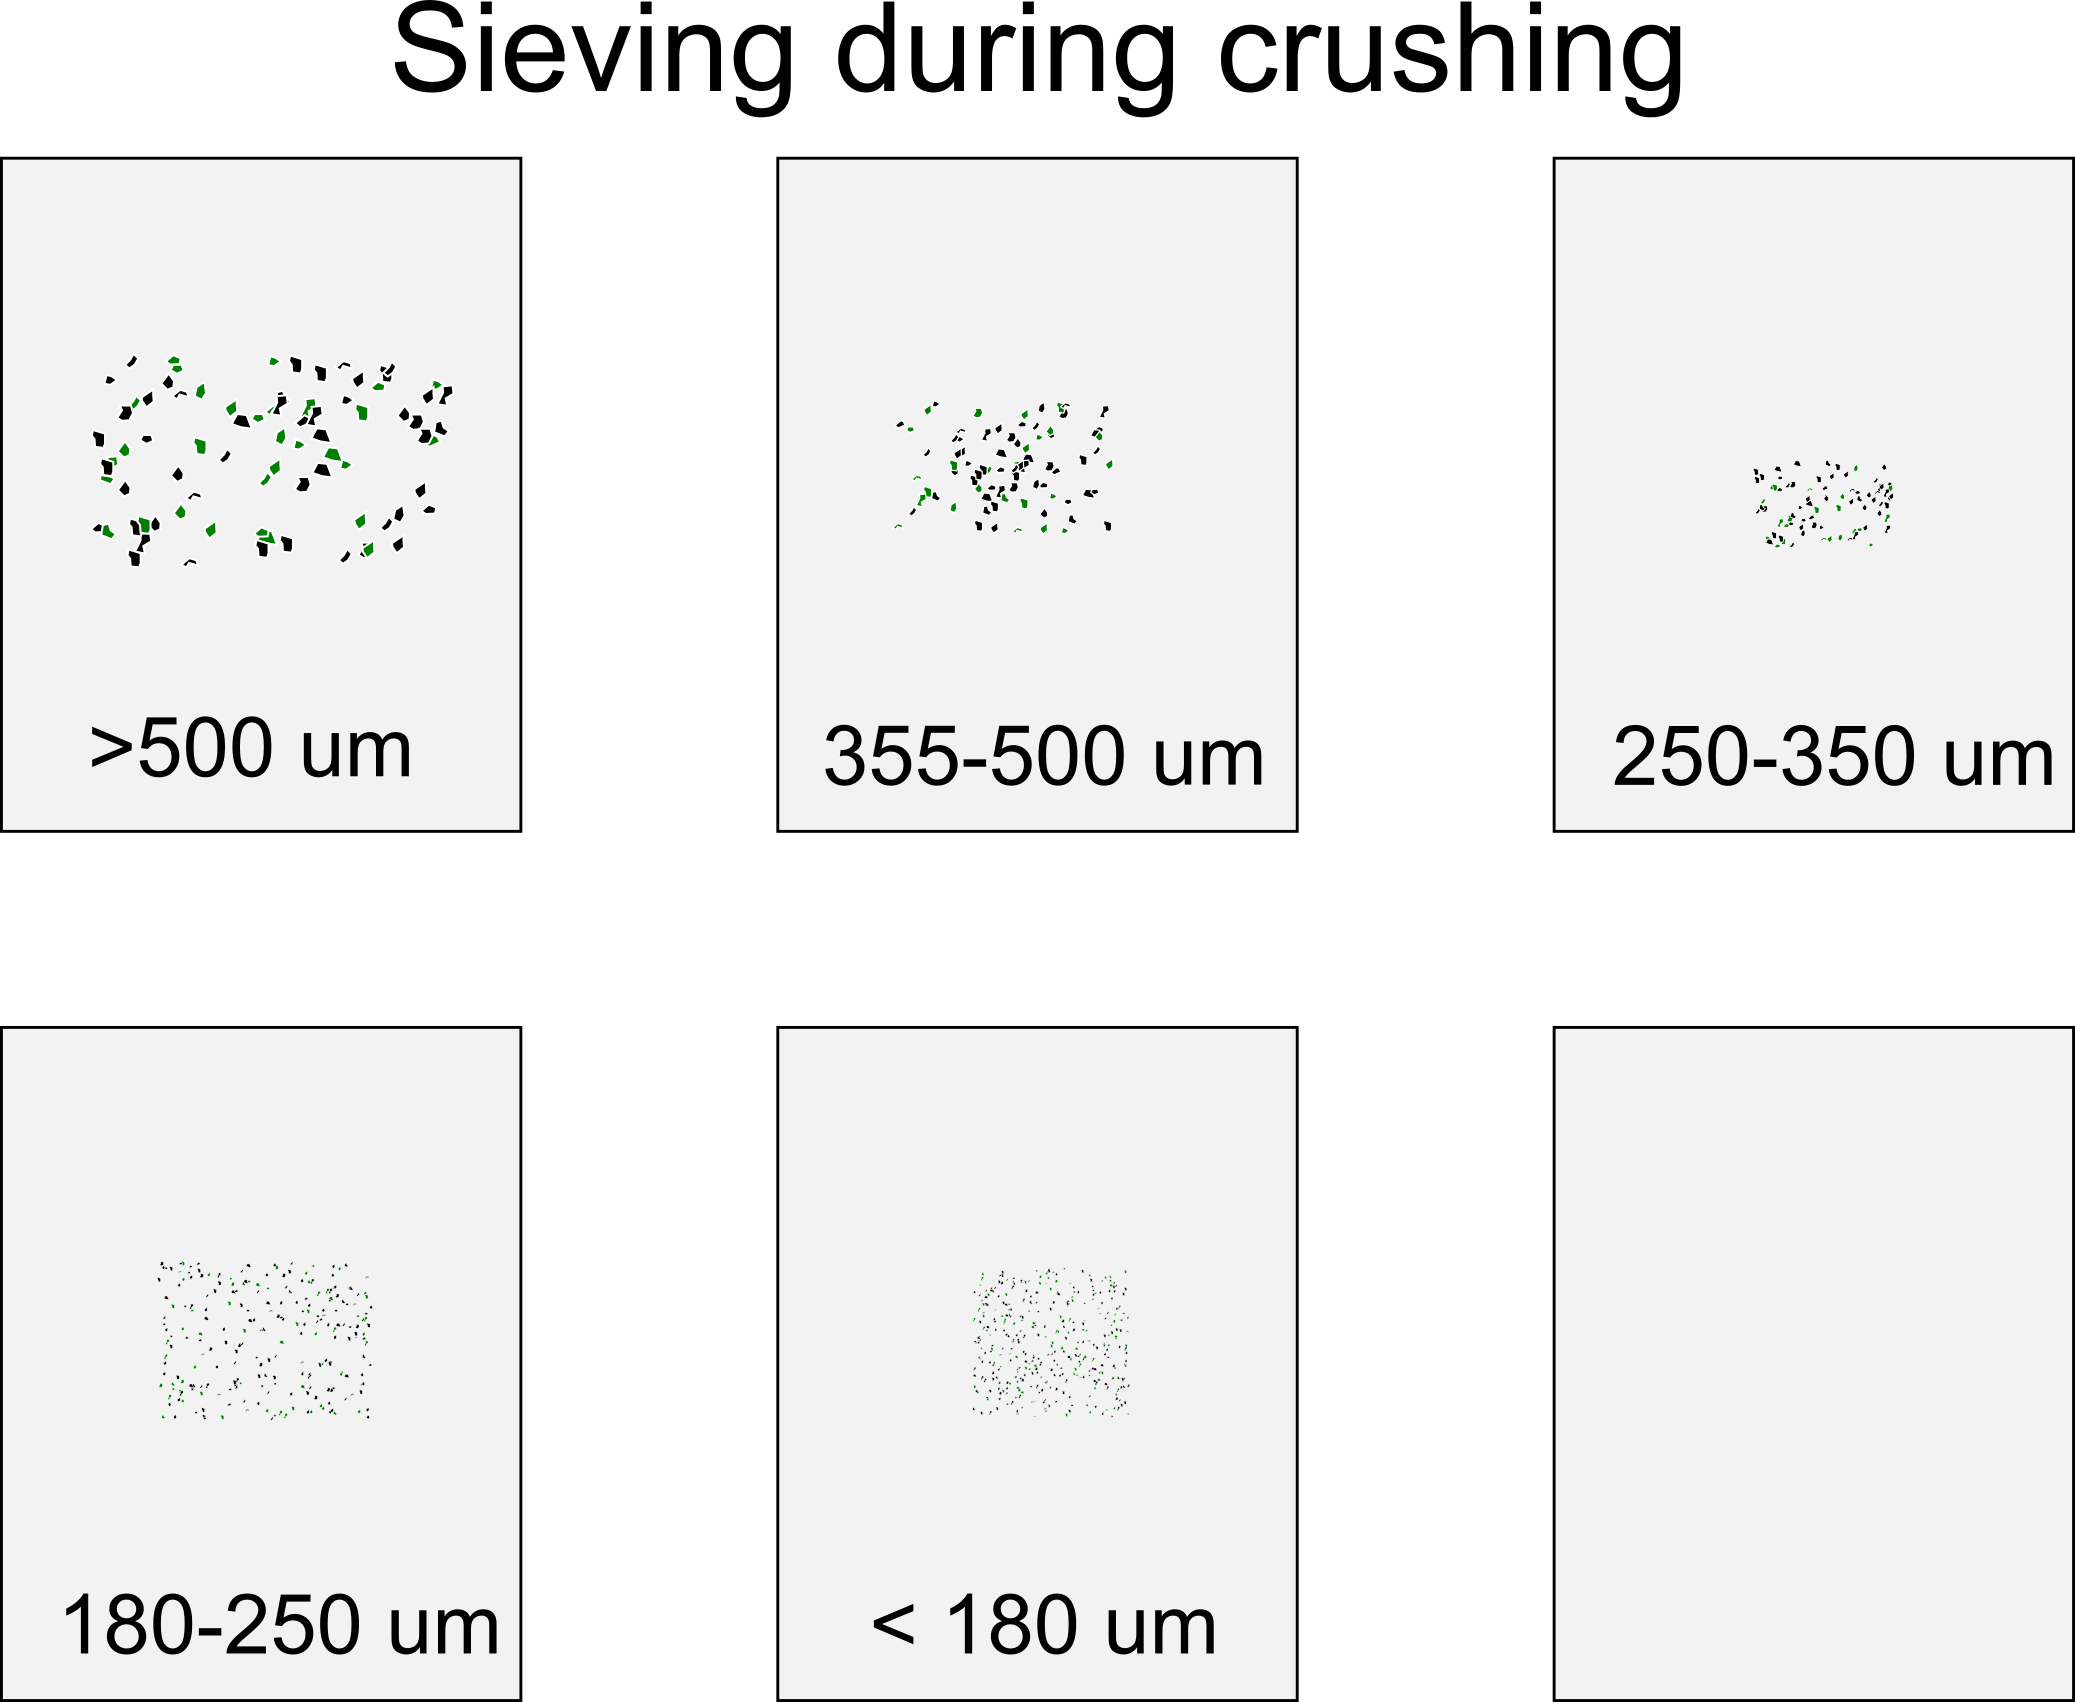
1.2.3. Sieving samples after crushing
Steps
1.2.3.1. Setting up your work area for sieving
Gather appropriate sieves.
Check sieves for stuck grains and clean if necessary.
Layout a piece of paper for each sieve you will be using, plus an additional for sample transfer.
Label each piece of paper with the corresponding sieve size.
Check Sieves
In general, always check a sieve before using it to ensure that there is no cross contamination.
Procedure
Wipe down top and bottom of sieve with a tech wipe and ethanol.
Check for grains stuck by looking through the sieve. This is done best by using a bright background (e.g. hold up to light) in order to see grains clogging the mesh.
If there are grains, refer to cleaning methods in sieve_clean.
1.2.4. Sieving Method
Sieving is conducted by using all metal sieves for a given range of grain sizes.
Steps
Set out a piece of paper for each sieve plus the pan and label them with the sieve range and sample ID. These will be used to pour the contents of each sieve as the sample is separated.
Gather available sieves from 150 µm to 350 µm in at least 100 µm increments. Using larger increments will make it more difficult during the picking stage. It is best to have a uniform grain size distribution.
Check sieves for errant grains within the mesh and remove. Proceed with caution as applying pressure on the mesh when removing grains. Too much pressure can warp and damage the sieve, reducing it’s lifetime.
Wipe each sieve with ethanol or acetone. This helps remove fine particles that may contaminate samples.
Stack the sieves along with the bottom pan and pour in enough sample to make a few layers of grains. Filling sieves with too much material will slow down how quickly you can reliably sieve the sample.
Shake the sieves and once the sample appears to have been sieved remove the top sieve and dump out it’s contents onto the labeled paper. Continue to shake the sieve while occasionally tapping the sieves on the table, encouraging the finer material to fall through the sieve.
After working yourself through the first round, repeat the steps by re-stacking the sieves and pouring more sample in until the sample is complete.
1.2.5. Progression Sieving and Crushing
Sieving and crushing a sample in conjunction with one another allows you to efficiently breakdown the sample. Once the sample has been initially crushed to ~<5 mm in size, the sample should be sieved. The coarsest sieve should be taken and put back into the crusher. This can be repeated until the jaw crusher no longer becomes efficient in crushing the material.
1.2.6. Shaking Sieves
Stack the determined sieve sizes. It is best not to go over 4 sieves.
Pour sample into the top most sieve so that it covers roughly half of the sieve.
Begin gently shaking the sieve side to side. Occasionally gently tap the stack of sieves on a table to knock loosely held grains to the sieve below. Continue to shake until it appears that the finest material has left the topmost sieve.
Remove the topmost sieve and place it on the labeled sheet. Continue the shaking motion and continue this process until you have gone through each of the sieves.
Once you have gone through each of the sieves and emptied them on to their respective sheets, repeat the process until you have gone through the rest of the sample.
1.2.7. Workspace Cleanup
1.2.7.1. Clean Sieves
Working over a sheet of paper, or directly over the rock waste bucket, scrub mesh with a fine wire or nylon brush to dislodge grains. Be careful not to apply too much pressure, which could deform the mesh.
With sieve turned upside down, apply back-and-forth strokes of the brush along the strands of the mesh, in circles, etc., to dislodge as many grains as possible.
Turn sieve over and repeat step (a) for the inner side of the mesh.
If necessary, run a needle tool along the wire mesh to pluck out stuck grains. Do not poke/scrape/scratch with a lot of force, as this could damage the mesh.
Repeat steps (a) through (c) as needed until all grains are removed.
Use an air hose to blow dust out of the mesh and off the metal surfaces of the sieve.
Give metal surfaces a final wipe down with a paper cloth and ethanol or acetone.
1.2.7.2. Clean Small Jaw Crusher
Procedure to clean the small jaw crusher in Wilkenson.
Steps
clean steel plates
Remove steel plates from bolts and place on the work area.
Spray the plates with distilled water and scrub with a wire brush to remove debri from plates.
Wipe down the plates with a paper towel and spray the plates with ethanol or acetone.
Dry plates with a paper towel.
wipe down jaw crusher
Wet a paper towl with distilled water.
Wipe down all surfaces of the jaw crusher to remove dust.
Pay special attention to the area beneath the axle of the back plate.
After the crusher has been wiped down with a wet towel, repeat with a clean dry paper towel.S
1.3. Groundmass Magnetic Separation
Description
Groundmass is the crypto to microcrystalline structure of a rock. It can comprise of glass, cryptocrystalline feldspar, pyroxene or olivine. Depending on the magnetic properties of the rock, the groundmass can be highly magnetic if it contains iron bearing oxides or non-magnetic if it is a felsic rock.
Procedure
Sieve the crushed and washed material to the target grain size.
Turn on the magnetic power source and set the amperage to 0.01 A.
Test the sample with a hand magnet.
If a significant amount of material sticks to the magnet. Keep the amperage at 0.01 A.
If a small amount of material or none stick to the magnetic, increase the amperage to 0.1 A.
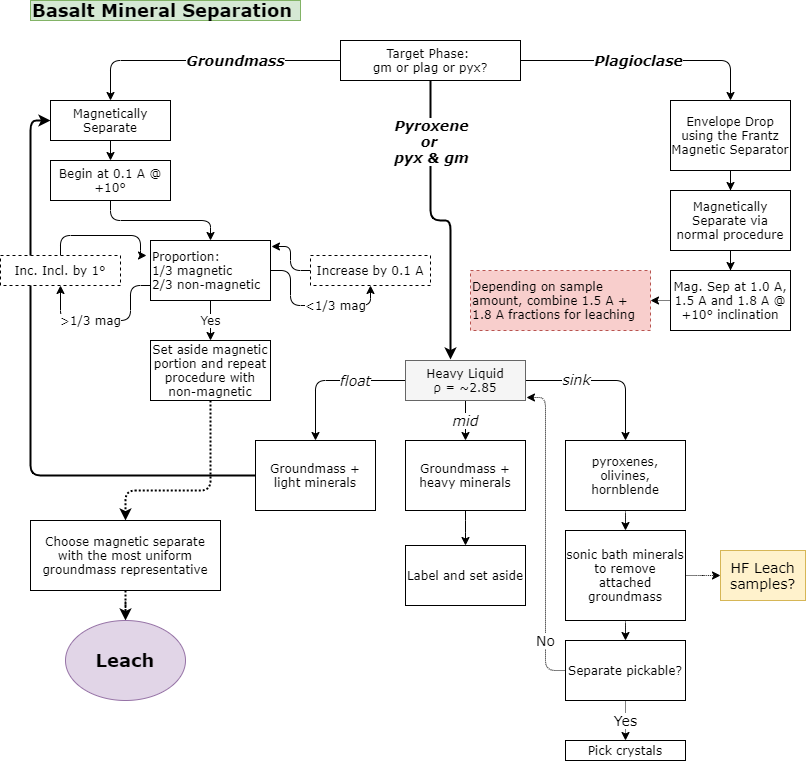
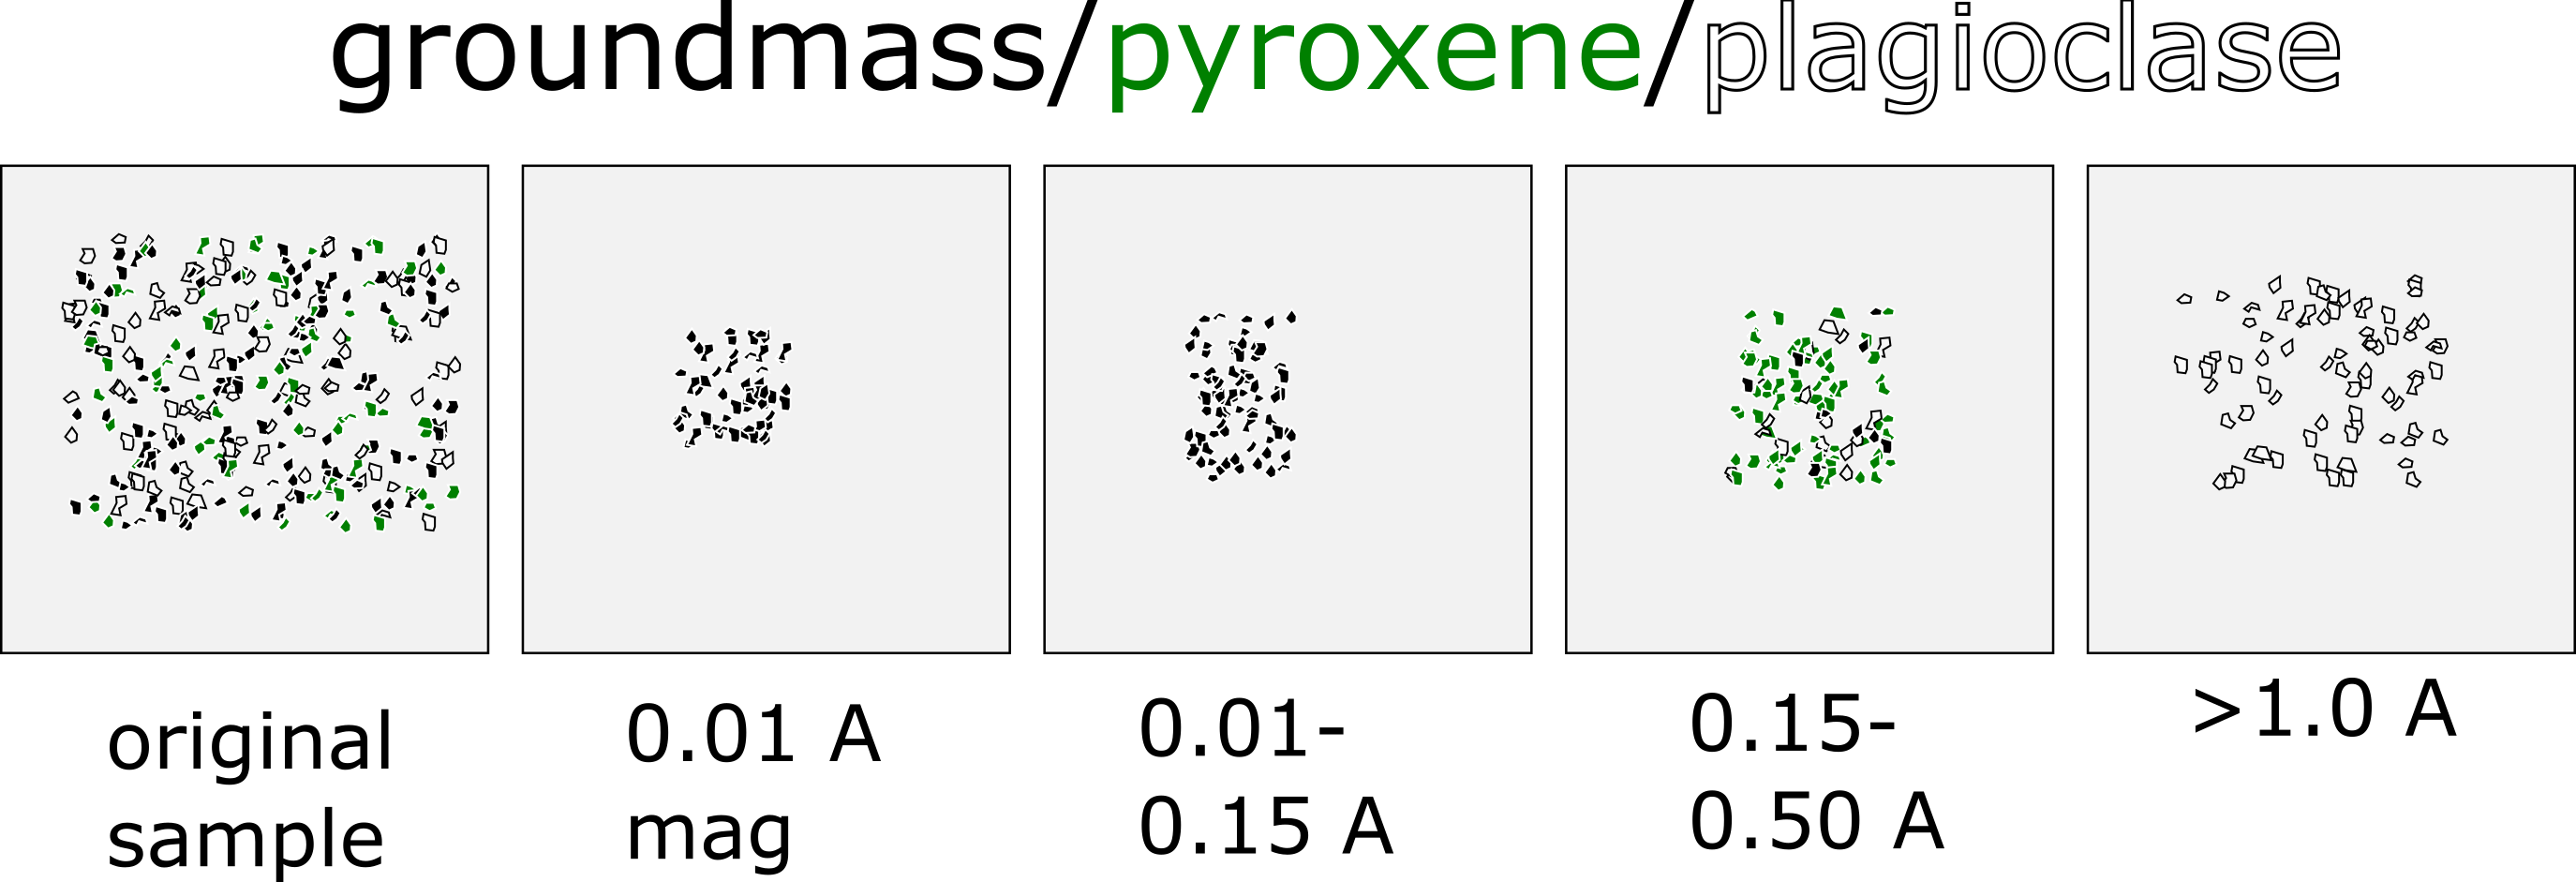
Example of grain type progression during magnetic separation
1.4. Standard Acid Leaching Procedure
This acid leaching procedure removes carbonate and clay products that may interfere or contaminate Ar/Ar analyses. The procedure involves placing the sample in a sequence of acids (1N HCl, 6N HCl, 1N HNO3, 3N HNO3) and placing them in a mild ultra-sonic bath.
Geologic Material
groundmass plagioclase
Steps
1.4.1. Workspace Preperation
Wipe down all surfaces with water and ethyl alcohol.
Inspect and clean equipment.
1.4.1.1. Acid Preperation
Dilution of acids from concentrate to appropriate normality for acid leaching. In general you will need 500 ml of each of the acids for a standard leach. Below are instructions for making 1 L of the respective acid. Calculations are taken from https://www.sigmaaldrich.com/chemistry/stockroom-reagents/learning-center/technical-library/molarity-calculator.html.
- acid_hcl_6n
From a stock solution of 37% w/w (12.178 M).
To make a 6 M solution, slowly add 492.703 mL of the stock solution to 250 mL deionized water. Adjust the final volume of solution to 1000 mL with deionized water.
- acid_hcl_1n
From a stock solution of 37% w/w (12.178 M).
To make a 1 M solution, slowly add 82.117 mL of your stock solution to 250 mL deionized water. Adjust the final volume of solution to 1000 mL with deionized water.
- acid_hno3_3n
Your stock solution of Nitric Acid is calculated to be 15.698 M based on a density of 1.413 g/mL, a formula weight of 63.01 g/mol, and a concentration of 70% w/w.
To make a 3 M solution, slowly add 191.113 mL of your stock solution to 250 mL deionized water. Adjust the final volume of solution to 1000 mL with deionized water.
- acid_hno3_1n
Your stock solution of Nitric Acid is calculated to be 15.698 M based on a density of 1.413 g/mL, a formula weight of 63.01 g/mol, and a concentration of 70% w/w.
To make a 1 M solution, slowly add 63.704 mL of your stock solution to 250 mL deionized water. Adjust the final volume of solution to 1000 mL with deionized water.
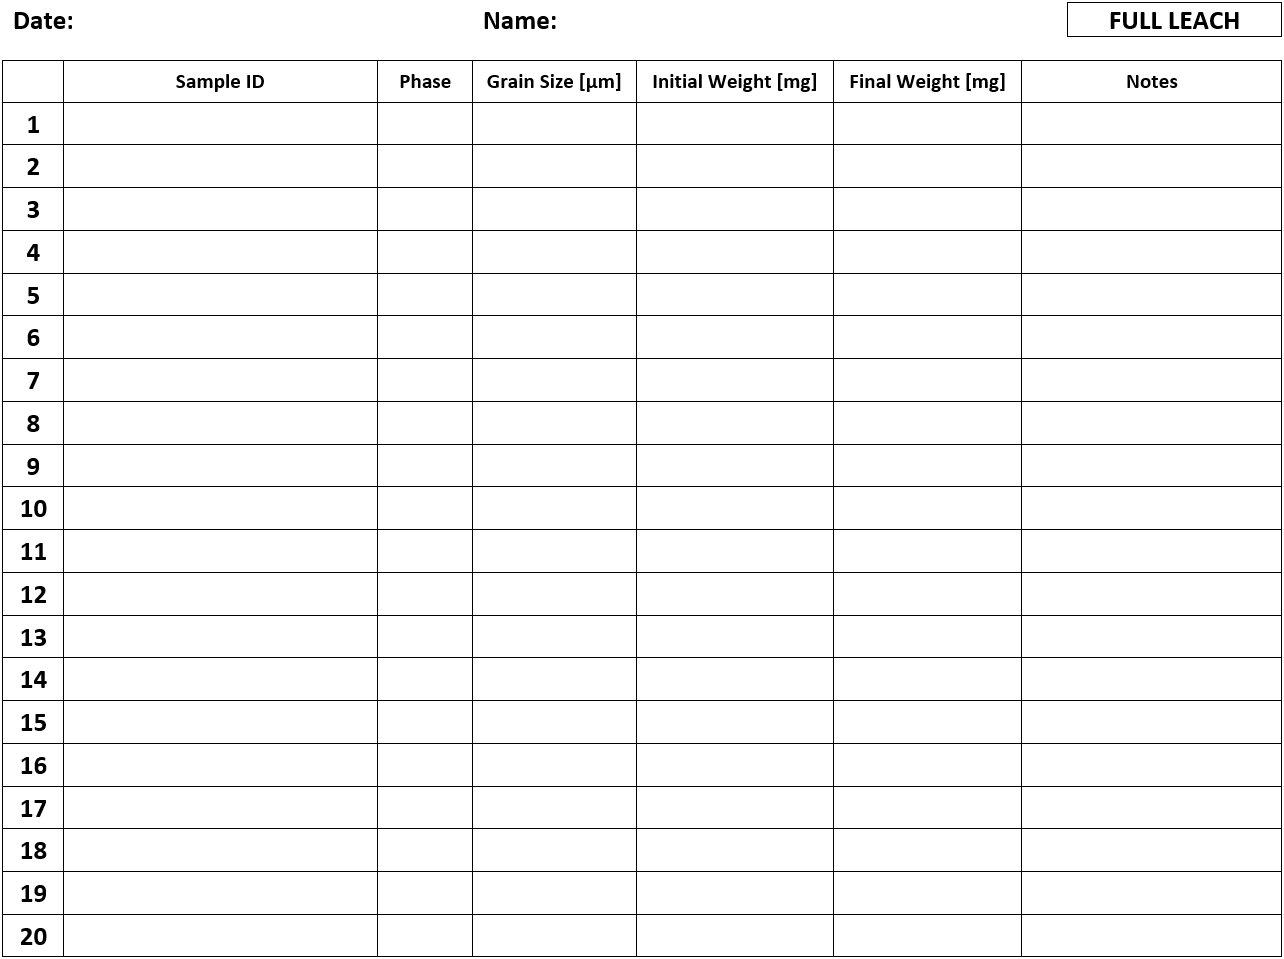
Acid Leach Log Sheet
Acid leaching is conducted in LDPE bottles. The bottles have pre-assigned numbers and the sample name is not put on the bottles, but assigned a number. The sample name is written next to the number of the available bottle.
Steps
Gather samples that will be leached.
Gather the same amount of LDPE bottles that are appropriatly sized for the amount of sample that will be leached.
Assign a number to a sample and write it down on the acid leaching log.
Check that the number and the assigned sample are correct.
Gather supplies and PPE.
- Personal Protection Equipment
Eyes: Tight-fitting goggles
Hands: Viton or nitrile gloves
Body: Lab coat, long pants and closed-toed shoes
- HDPE Bottles
Use large HDPE bottles if you have lots of sample. They sit better in the bath, but beware, you will use more acid.
Use small HDPE bottles for small samples. They tend to tip over in the bath.
- Acid (best to prepare acid ahead of time)
1L of 1N HCl
1L of 6N HCl
1L of 1N HNO3
1L of 3N HNO3
3 - 1,000 mL glass beakers (for acid waste)
2 - 300 mL glass beakers (for pouring acid into and out of bottles)
2 - small plastic trays
Set ultrasound to 50°C.
Line up the samples in the fume hood on one of the plastic work trays.
Setup two of the 1 L beakers on a small tray, next to the tray with the samples. These two beakers will be used for acid waste.
Take a sample and remove the cap and place the top of the cap downwards on to the plastic tray.
- Acid Leach Step 1M HCL.
Carefully pour about the acid equal to about double the volume of grains. Generally no more than half the volume of the bottle. Close the bottle and swirl the bottle for a few moments to mix.
Continue adding acid for the remaining samples.
Set timer on the sonic bath for 60 minutes..
Swirl samples every 15 minutes.
If solution becomes cloudy, replace with fresh acid.
Rinse at least 3 times with Milli-Q water after 60 minutes is up.
Pour off acid into 1,000 mL beakers during rinse.
Repeat last step for each acid as well as an additional time for milli-Q water. Continue to rinse until the sample is no longer cloudy.
Label 300 mL glass beakers with the numbers that were used for acid leaching.
Transfer the samples from the bottles to the glass beakers with their respective numbers. To do this, add a small amount of milli-q water to the bottle. Swirl the water and quickly pour it into the glass beaker. Repeat to get all of the material out of the bottles.
Place samples in an oven to dry overnight. The oven should be at a temperature no higher than 55 C.
Leave it the way you found it.
Put all items away.
Clean all glass beakers with water.
Wipe down work surfaces.
Clean used LDPE bottles and beakers.
1.5. Picking Groundmass
How to pick samples for Ar/Ar Analysis
Safety
Brightness of scopes.
1.5.1. Workspace Preperation
Wipe down all surfaces with water and ethyl alcohol.
Inspect and clean equipment.
Picking Tools
Plates
Choose a plate that has a constrasting color to the types of grains you are working with. For plagioclase separation it is best to pick with a glass plate using transmitted light. This allows the identification of crystals with inclusions, which need to be avoided.
Picks
Brush
Placing sample on a plate
Pour a small amount of the sample onto one side of the picking plate. Then, using a brush, spread a thin line of grains across the plate. A thin line will make it easier to focus on each grain while being able to compare it to other grains.
Take a small amount grains from the pile and spread them across the plate.
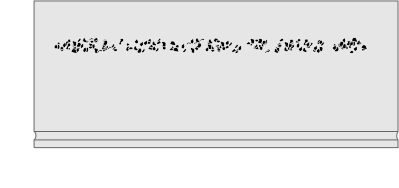
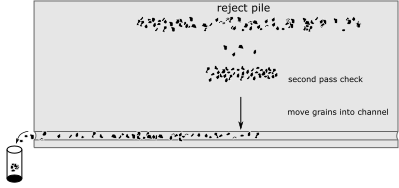
To begin picking grains, you want to quickly pick grains that are uniform and represent the majority of the sample and avoid signs of alteration or inclusions. You don’t want to spend too much time analyzing each grain, another more careful pass will be made on the grains in the next step. For now, quickly reject grains that do not look adequate.
Bring ‘good’ grains to the bottom of the plate and ‘bad’ grains to the top.
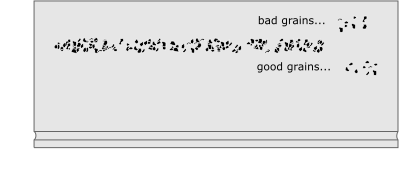
First Pass grain picking
You should end up with two distinct piles of grains of ‘good’ and ‘bad’.
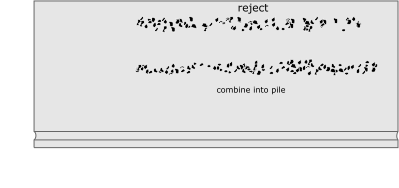
Second Pass
Once the line of grains has been gone through, brush the ‘good’ grains to the bottom of the plate and recombine them into a pile. Here you will be able to compare the grains more closely to one another and reject grains that appear to be more altered than others.
From the second pass pile, move grains into the trench at the bottom of the plate.
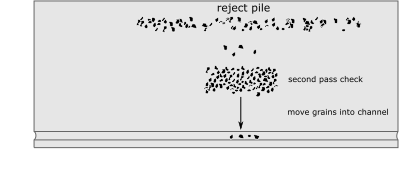
Go through the pile and move the accepted grains into the ‘trench’ and move the rejected grains up to the top to the plate with the rest of the grains.
Brush good grains into a vial.
1.6. Pack samples for Irradiation
Procedure to pack picked samples for irradiation.
Steps
Weigh samples to the desired amount to irradiate. Generally enough for two analyses.
Put pre-made aluminum capsule in the pack plate.
Use funnel to pour sample into capsule.
Clip top of the capsule to leave a few millimeters of aluminum to fold over the material.
Make four folds over the material and use the streel stamp tool to mould the capsule.
1.7. Short-term project archivel
Projects that have had all samples prepered and irradiated can be move down to into the short-term storage in Burt Basement Room 05.
Steps
Gather all the samples related to the given project.
Ensure that each sample is properly labeled and contained in a singular bag.
Check and make sure a tyvek label is in each sample bag labeled with the 1) Project ID, Project PI, and the sample name.
Place all samples in the same storage bin. Print out a list of all the samples in the bin.
Update the Argon Lab Spreadsheet Log archive location to Burt-05
1.8. References
Koppers, A. A. P., Staudigel, H., & Wijbrans, J. R. (2000). Dating crystalline groundmass separates of altered Cretaceous seamount basalts by the 40 Ar/ 39 Ar incremental heating technique. Chemical Geology, 166(1), 139–158.
